Showing posts with label cheese. Show all posts

Wednesday, January 4, 2012

Chile Relleno and Sopes with Beef

I love Mexican food! In our home at least once a week, there is something Mexican served at the table for dinner.  Authentic Mexican food is delicious, satisfying and very healthy, not like Tex-Mex food or American versions of Mexican food that have a pound of cheddar cheese served on your rice, beans or inside of a burrito.  In my visits to Mexico, I rarely see cheddar cheese smothered on the food (except for in American tourist areas).  A couple of my favorite common cheeses used in Mexico is Queso Fresco or Cojita which are sparingly served over beans, meats or rice.  You can make queso fresco at home, as it is very easy to make.  I learned to make queso fresco years ago in Mexico and it truly is easy to make.  Here is a blog that shows you how to make your own queso fresco at home: http://www.thekitchn.com/thekitchn/cheese/make-queso-fresco-the-cheesemonger-099011

So, now that we have the cheese for chile, let's stuff them, fry the and eat them!  YUM! 

When choosing the chile for your recipe, you have a wide variety of choices:  Anaheim, Poblano, Habanero, Marconi, Hatch or even Jalapeno chiles.  You choose your favorite and I assure you they will turn out very tasty when made with queso fresco.  I do prefer queso fresco over cream cheese or cheddar cheese to stuff chile peppers.


Sadie's Easy Chile Relleno Recipe

Serves 6

6 Poblano or Hatch Chile (if in season), charred and peeled
1 pound of Queso Fresco, mashed with spoon

Batter:
1 cup flour
1 teaspoon baking powder
1 cup milk
1 egg
salt

Vegetable oil for frying

If you have a gas stove, you can char the chile pepper on the stove top by turning frequently, until all sides are charred.  If you do not have a gas stove, you can use the oven to roast the chile peppers.

Preheat oven to 450*F

1.  Place chiles on a sheet pan; roast in oven for 20 minutes; turning chile often, until all sides are done charring.  You can remove the skins while still warm; they peel off very easily.  I suggest that you do not run the chile under water to remove the skin as you will be washing away all the oils and sweetness of the chile down the drain. 

2.  While the chile is roasting, you can prepare the batter.  Combine flour, baking powder, milk, egg, salt; mix well.

3. Once the charring and peeling is complete, slice one side of the skin (top to bottom) of the chile (careful not to run the knife through both sides) and spoon out the seeds. 

4. Take the mashed queso fresco and stuff the chile (no measurements are given as the sizes of chile vary). You want to stuff them so that both flaps close together (do not over stuff).

5. If you own a deep fryer; heat your oil to 350*F.  If not, use a deep pan and add enough oil (about 1 inch in depth) and heat over medium high heat.

6.  Dip each stuffed chile in the batter and place in the hot oil to brown all sides.  Remove from oil and place on a plate covered with paper towels to absorb the oil.

Serve warm with your favorite sauce or salsa.  

SOPES - What are Sopes?  They are a small version of corn tortilla (thicker) in the shape of a small frisbee or  a small soup bowl, to hold meats, beans, salads in the middle.  I had Sopes for the first time in a small Mexican Village named Santa Clara del Cobre in Michoacan, Mexico.  I forgot about these delicious little corn disks, until a friend in Mexico City mentioned them, and it brought back such delicious memories of the first bite I had of Sopes with Frijoles (beans).  I looked up several recipes on the Internet in Spanish, for an authentic recipe and found one from a Grandmother in Mexico.  I love this web site/blog and will be using it for several authentic recipes in the future.   If you speak and read Spanish, here is the link: http://www.lasrecetasdelaabuela.com/antojitos/sopes.htm

Sopes

SOPES
recipe altered by Sadie

Makes 24

2 cups Masa Harina Corn Flour
1/2 teaspoon salt
1 cup of hot water
more hot water as needed
Vegetable oil for frying

1.  Sift Masa Harina and salt in a large bowl; make a well in the middle. 

2.  Add hot water 1/4 cup at a time and start mixing until you have a perfect dough consistency: a little firm with some spring, not completely firm and not dry or sticky.

3.  Cover dough with a plastic cover and let sit for about 30 minutes.

4.  Heat a cast iron skillet (preferably) to medium high heat.

5.  Keeping the dough covered at all times with a damp cotton towel, take enough dough to form the size of a golf ball (2-3 ounces).

6.  If you own a tortilla wooden press, you can line the inside of the press with plastic or wax paper (I prefer wax paper), to keep the dough from sticking to the wood.   If you do not own a wooden press, you can roll out the dough to measure 1/4 inch thick and about 4 inches in diameter.  You can shape the dough with a large round cookie ring or by taking a large water glass with a big mouth (I used a cookie ring to cut the dough).

7.  On hot skillet, heat Sope on skillet until they turn brown on both sides (about one minute).  Remove from skillet.

8.  While still hot, shape the outside of the tortilla to create a lip on the outside of the tortilla.  I used the bottom of a small pyrex glass bowl (1 cup Pyrex bowl) to shape the tortilla into the Sope.  Press the glass in the middle of the tortilla and raise the sides to create a lip.  Set aside and let cool until all tortilla disks are complete.

9.  If you own a deep fryer; heat your oil to 350*F. If not, use a deep pan and add enough oil(about 1 inch in depth) and heat over medium high heat.

10.  Place sope in hot oil and cook until crispy and brown on both sides.  Place on a cookie sheet and cover to keep warm until ready to serve.

11.  Sope can be filled with beans, meat, salad, seafood and served warm.

CHEF NOTES:  The Abuela recipe from Mexico has a recipe for chiles that are made into a sauce and each of the sopes after the first heating, is coated with the chile sauce and then fried.  This adds more spice to the sope (optional).

Chile Relleno with queso fresco and
Sopes with shredded beef, queso fresco and topped with Pico de Gallo


Buen Provecho

Sunday, October 30, 2011

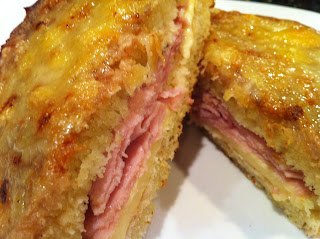
Croque Monsieur

There is nothing better than the smell of fresh baked bread in your home; it is truly blissful!  

I just finished baking Brioche, but not just any brioche; Thomas Keller's brioche, which is found in all his cook books in honor of his friend Jean-Louis Palladin; one of the greatest French chefs that immigrated to the USA in the late 70's.  You can read about Jean-Louis Palladin here http://www.jamesbeard.org/index.php?q=education_jlp_about 


Croque Monsieur
Bless the French for their incredible culinary cuisines; Croque Monsieur is definitely one of the best ham and cheese sandwiches our family loves.  For years, we have eaten Croque Monsieur or even a Croque Madame (notes on the Madame later) in fine restaurants, but nothing compares to eating this sandwich in France.  Our girls love, love eating Croque Monsieur whenever it is offered on a menu and lucky for them; they've had it in many of our travels such as: France, London, Canada and when we visit my home town of Los Angeles.  When we dine at Bouchon in Beverly Hills and they have it on their menu; we are definitely ordering it. We also loved Croque Monsieur at Anisette Brasserie located in Santa Monica, which sadly closed this year; but it was outstanding and one of our favorite places that made it very similar as our favorite restaurants in France.  In Seattle, well, we have yet to find a great Croque Monsieur we like in a restaurant, but we sure love it at home at the Laurenti Whitley Casa.

For the Brioche recipe; well, I cannot share Thomas Keller's recipe on my blog (it really is Jean-Louis' recipe), but you can purchase any of Thomas Keller's cook books and you are sure to find it in there.  Thomas Keller made sure to have the recipe [printed] in his cook books as it is the best brioche recipe and definitely, the best I've ever tasted.  You can find part of the recipe written without measurements at http://www.imafoodblog.com/index.php/2009/02/04/how-to-make-brioche-the-keller-method , but I highly recommend to buy one of his books (for the at-home-cook, buy Ad-Hoc, it's one of his easiest cook books to follow and with ingredients you can find in your local grocery stores.

Sadie's Croque Monsieur Sauce and Sandwich Recipe for 4

Mornay Sauce with Dijon
2 tablespoons butter
2 tablespoons flour
1 cup of whole milk
freshly ground nutmeg (dash)
1 tablespoon of Dijon mustard "Grey Poupon" is my favorite
1/4 cup shredded Gruyere cheese
salt

Making a roux for 4 Croque Monsieur sandwiches.
Melt butter on medium low heat, add flour and stir with whisk for about 4 minutes.  Slowly add milk while whisking; add nutmeg and mustard and continue whisking until roux is almost thick; add cheese and salt; continue to whisk until thick.   Set aside
(If holding sauce for a while, be sure to cover the surface with a plastic wrap so that it does not create a crust on top).


Ingredients for Sandwich
4 slices of a high quality black forest ham
4 slices of a high quality Gruyere
Freshly baked Brioche; cooled and sliced (4 slices for open faced sandwich or 8 slices for sandwiches)
1/2 cup grated Gruyere
2 tablespoons of melted butter
1 sheet pan covered with parchment paper

Heat oven on Broil and while it is heating, build the sandwiches

1. Heat a skillet pan (preferably a cast iron skillet)
2. Brush melted butter on outside of bread
3. Build sandwich with a little bit of Mornay Sauce on the inside of your bread, gruyere cheese  and ham; top with second slice of bread. If making an open faced sandwich, do not add second slice of bread on top. Brown sandwich in skillet; carefully turning over to both sides. 
4. When both sides are toasted, place sandwiches on a sheet pan covered with parchment paper (the pan is covered with parchment, not the sandwiches).
5. On the top slice of your bread add Mornay Sauce and top with grated Gruyere. (For open faced sandwich, top with Mornay Sauce and Gruyere on top of the ham).

Broil sandwiches for 1-2 minutes until sauce and cheese begin to bubble and turn slightly golden in color.

Serve with French Fries or serve on its own.

Wait, did you think I forgot about Madame?  No, I did not.  Croque Madame is the recipe above, but with a fried egg to complete the top of the sandwich.  Place the egg on top of your sandwich after the sandwich comes out of the broiler. It's common to have it on an open faced sandwich, but I've seen it served with a full sandwich as well and it is just as delicious!

Bon Appetit